
With the release of RHEL 9.4, Red Hat have introduced a new deployment method that takes a container-native approach at managing the Operating System. For more information about image mode for RHEL including hands-on labs, it’s worth taking at a look at these links:
- Red Hat Developers: Image mode for Red Hat Enterprise Linux
- Experience the AI-ready OS with image mode for Red Hat Enterprise Linux
- Using image mode for RHEL to build, deploy and manage operating systems
- Image mode for Red Hat Enterprise Linux: A quick start guide
Ansible and Satellite
As a sysadmin, I wanted to kick the tyres on this new technology preview. Managing a fleet of RHEL servers I have Red Hat Satellite managing the content, and Ansible orchestrating the deployment and configuration of the servers. Let’s look at how I use those tools today:
Satellite – content source for all servers. Lifecycle management of the server estate – ensuring updates are deployed in a controlled, sequential manager. It’s a reporting hub, capturing the compliance and errata status of all my hosts. It’s a communications gateway allowing my servers to use Red Hat Insights. Optionally, it’s a provisioning method of all servers.
Ansible – an automation orchestration engine, automating tasks and making sure the server estate is consistent. It defines the configuration of the environment and helps reduce configuration drift.
The two technologies work hand in hand. So a request for a new server is made, Satellite and Ansible combine to build and manage the server (physical, virtual or cloud) and we manage the server for as long as it is needed – sometimes over many years.
We can take advantage of our already established setup and make a couple of minor adjustments to quickly get up and running with image mode for RHEL:
- Build a server as we do today, for example building a RHEL 9 virtual or physical server
- Within Satellite, sync the rhel9/rhel-bootc image (if not already) from the container registry.
- Make use of the existing Content Views – simply add the rhel9/rhel-bootc container repository, perhaps with some appropriate filters according to the lifecycle
- Convert the newly provisioned RHEL 9 server into image mode
- Manage updates via Satellite
- We’ll use automation where we can
Mirror bootc in Satellite
We’ll begin by mirroring the rhel9/rhel-bootc image from registry.redhat.io There are a couple of different ways of doing this. Firstly, you can use “Repo Discovery”. Navigate to Content -> Products and click the ‘Repo Discovery’ button. The default repository type is ‘yum repositories’ but you can change this to ‘Container Images’. The page defaults to Red Hat Registry (registry.redhat.io) so go ahead and enter your Red Hat username and password. By default the search will bring back all images, but we know we want rhel9/rhel-bootc so enter that in the Registry Search Parameter field. Click the ‘Discover’ button and you should have a screen looking like this:
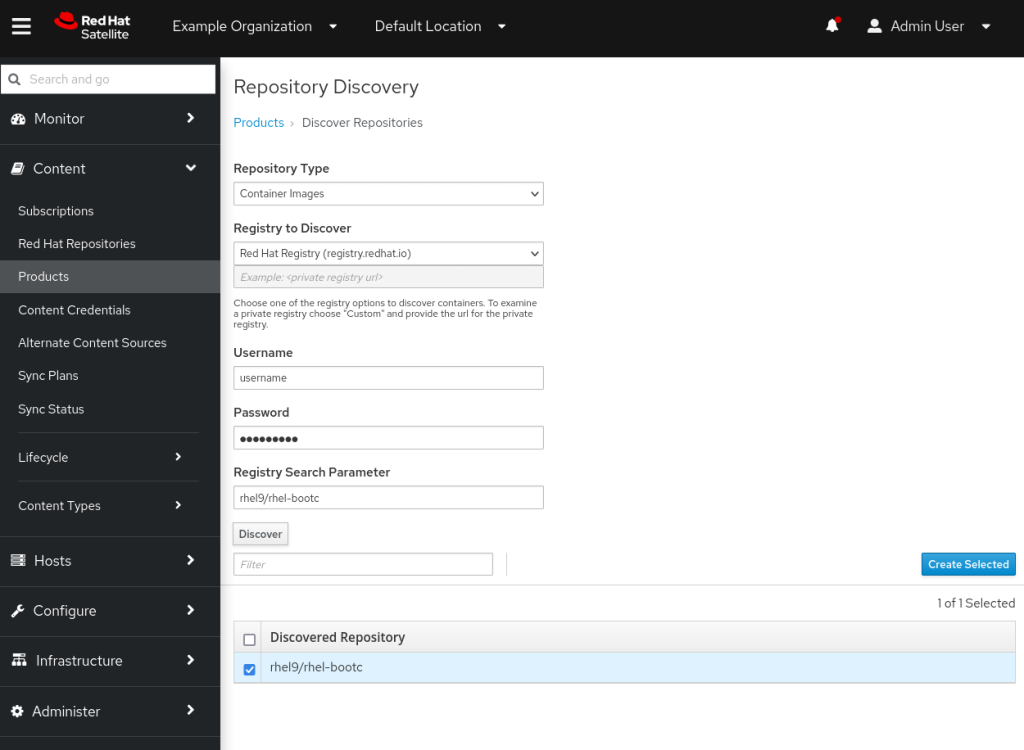
Select the rhel9/rhel-bootc image and click on create selected. On the next page I created a New Product of name ‘rhel-bootc’ with the same label, and selected the options to leave the repository Unprotected but with Verify SSL enabled. It looked like this:

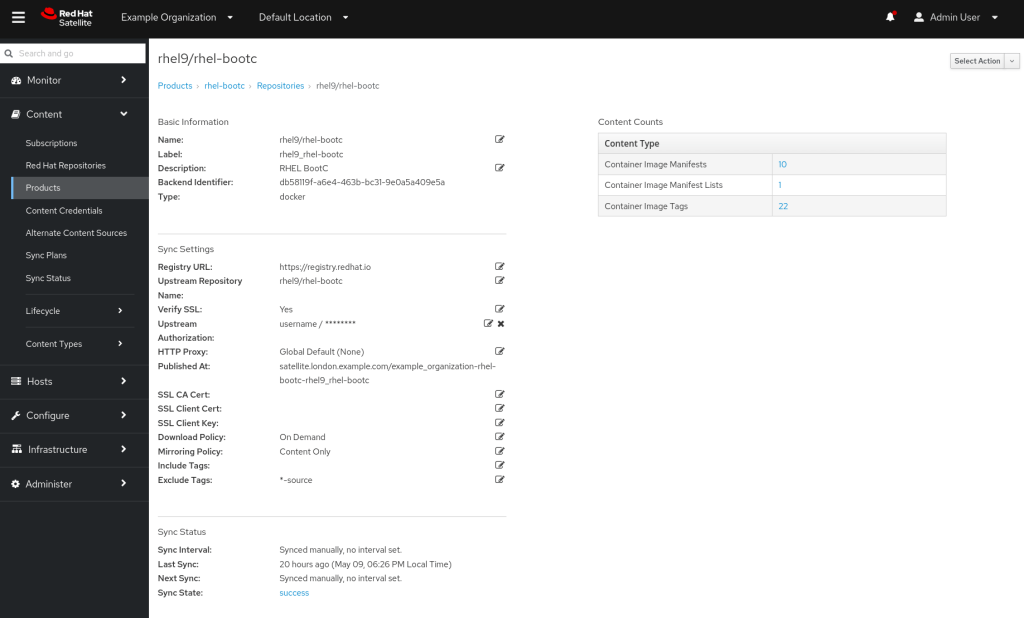
After creation, I modified the repository and set the ‘Download Policy’ to On Demand, since I’m doing this on a test server with limited resources. This means the first client that requests the image will have to wait slightly longer while it’s downloaded from the CDN via Red Hat Satellite, but we gain by saving on Satellite storage space. The final configuration looks like this:
Automating the repository creation
The repository can then be synchronised and added to a schedule according to your own environment requirements. Can we automate the product creation and repository settings? Yes, we can use the redhat.satellite Ansible collection. Here’s what the playbook looks like like:
---
- name: Configure bootc product and repository
  hosts: all
  connection: local
  gather_facts: no
  collections:
    - redhat.satellite
  vars:
    satellite_admin_user: admin
    satellite_admin_password: !vault |
          $ANSIBLE_VAULT;1.2;AES256;
          3763656136XXXX
    my_satellite_product:
      - name: rhel-bootc
        label: rhel-bootc
        description: RHEL BootC
        organization: Example Organization
    my_satellite_repository:
      - name: rhel9/rhel-bootc
        label: rhel9_rhel-bootc
        description: RHEL BootC
        organization: Example Organization
        product: rhel-bootc
        content_type: docker
        url: "https://registry.redhat.io"
        docker_upstream_name: rhel9/rhel-bootc
        unprotected: true
        upstream_username: username
        upstream_password: !vault |
          $ANSIBLE_VAULT;1.2;AES256;
          37636XXXX
        download_policy: on_demand
        mirroring_policy: mirror_content_only
        validate_certs: true
        exclude_tags: "*-source"

  tasks:
    - name: Check satellite_admin_password is provided
      fail:
        msg: satellite_admin_password needs to be supplied
      when:
        - "satellite_admin_password is not defined"

    - name: Set Satellite URL
      set_fact:
        satellite_url: "https://{{ inventory_hostname }}"

    - name: "Configure Products"
      redhat.satellite.product:
        username: "{{ satellite_admin_user }}"
        password: "{{ satellite_admin_password }}"
        server_url: "{{ satellite_url }}"
        organization: "{{ product.organization }}"
        name: "{{ product.name }}"
        description: "{{ product.description }}"
        label: "{{ product.label }}"
      when: product is defined
      loop: "{{ my_satellite_product }}"
      loop_control:
        loop_var: product

    - name: "Configure Repositories"
      redhat.satellite.repository:
        username: "{{ satellite_admin_user }}"
        password: "{{ satellite_admin_password }}"
        server_url: "{{ satellite_url }}"
        organization: "{{ repository.organization }}"
        name: "{{ repository.name }}"
        description: "{{ repository.description }}"
        label: "{{ repository.label }}"
        product: "{{ repository.product }}"
        content_type: "{{ repository.content_type }}"
        url: "{{ repository.url }}"
        docker_upstream_name: "{{ repository.docker_upstream_name }}"
        unprotected: "{{ repository.unprotected }}"
        upstream_username: "{{ repository.upstream_username }}"
        upstream_password: "{{ repository.upstream_password }}"
        download_policy: "{{ repository.download_policy }}"
        validate_certs: "{{ repository.validate_certs }}"
        mirroring_policy: "{{ repository.mirroring_policy }}"
        include_tags: "{{ repository.include_tags | default(omit) }}"
        exclude_tags: "{{ repository.exclude_tags }}"
      when: repository is defined
      loop: "{{ my_satellite_repository }}"
      loop_control:
        loop_var: repository
Adding bootc to Lifecycle and Content Views
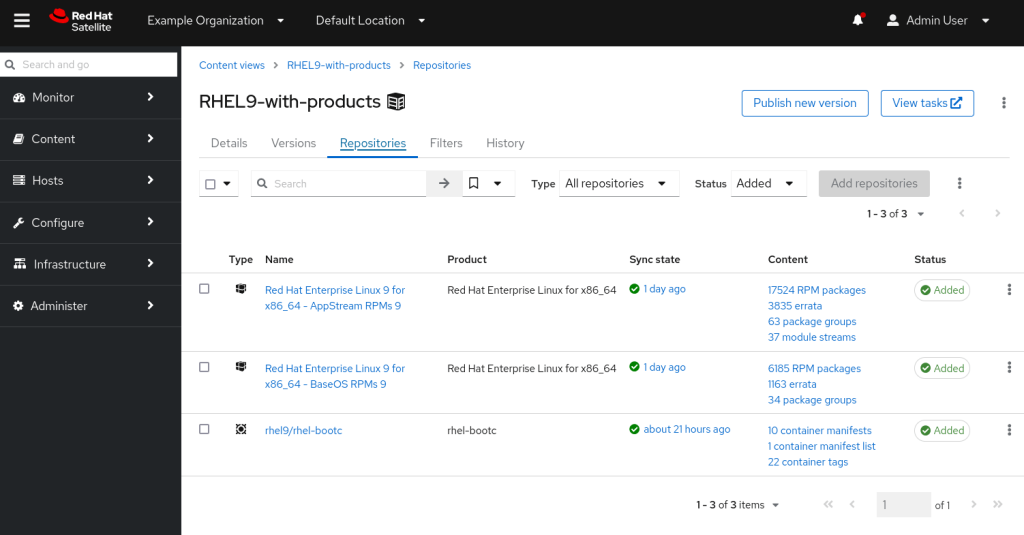
With the container repository now synchronised, we can add it to the same Lifecycle and Content View as our existing environment. In this example, I have the two standard RHEL 9 repositories (BaseOS and AppStream) and then add rhel9/rhel-bootc to it:
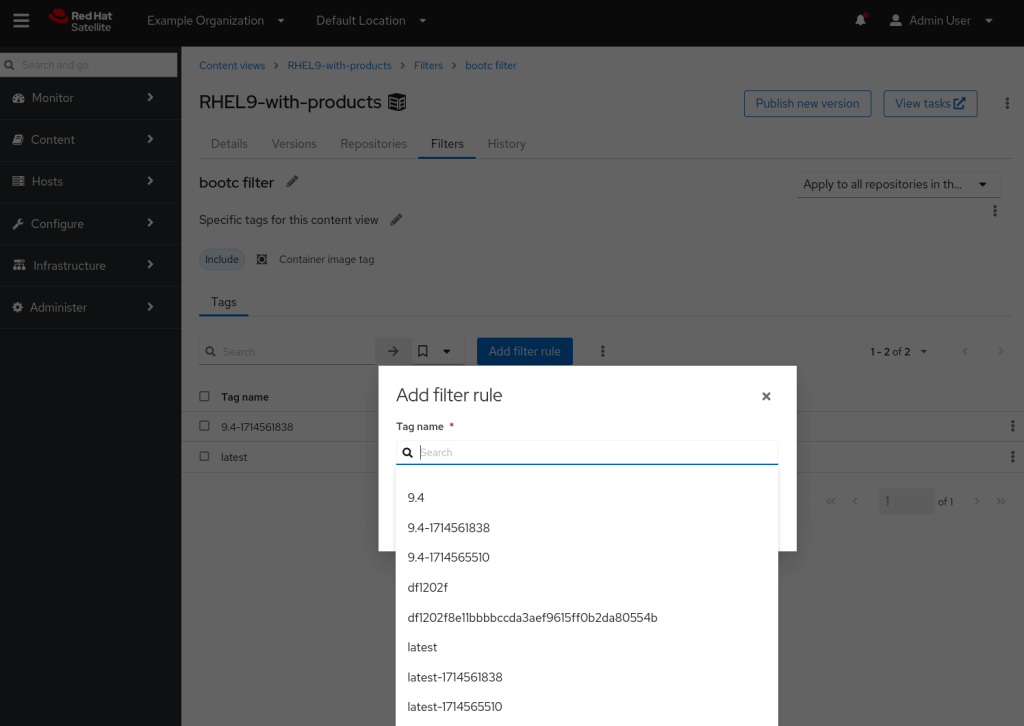
Finally, we recall that one of the main benefits of Content Views and Lifecycle Environments is we can deploy updates in a controlled manner. As such, we’ll add a filter on the rhel9/rhel-bootc repository with a specific image tag that we want to test. We add a single tag for testing – 9.4-1714561838.
The final piece of information we need to know, is how can our clients use this published image from our content view? The answer is to navigate to Content, Content Types, Container Image Tags and then select the one we are interested in. If we select it, and click on the Lifecycle Environments tab, we can see in which Environments this image is available, along with a repository path, as shown below.
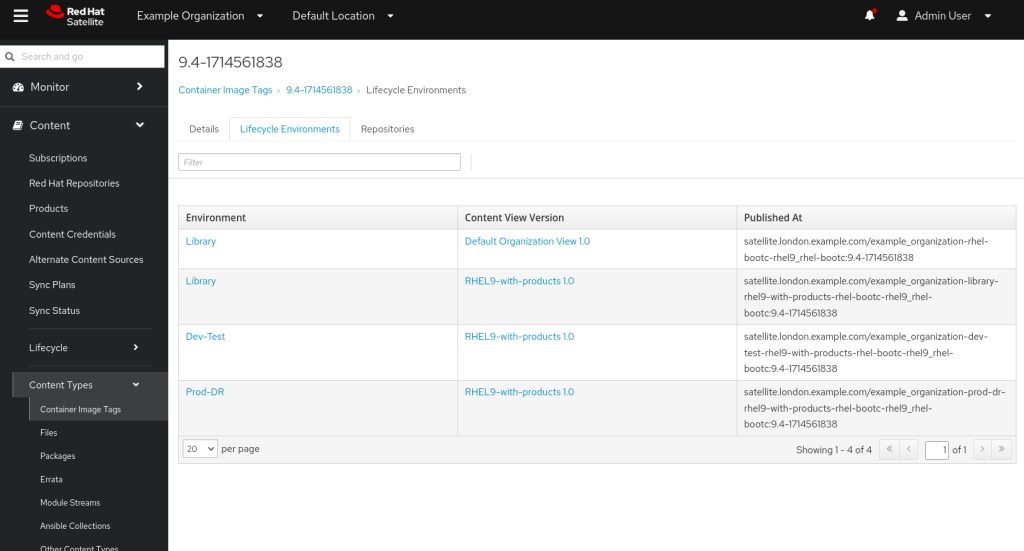
For example, a server in the Dev/Test environment with version 1.0 of my RHEL9-with-products content view will use the following:
satellite.london.example.com/example_organization-dev-test-rhel9-with-products-rhel-bootc-rhel9_rhel-bootc:9.4-1714561838Convert a RHEL server into image mode
With everything setup on the Satellite side, we can now convert a test server to image mode.
CAUTION!! You likely want to begin to work with the conversion process on a non-important test server that you don’t care about. The conversion removes the /boot and /boot/efi partitions and can delete the existing Linux installation. (See also warning in the official documentation here)
To begin, we will now provision a new RHEL 9.4 server using our existing tools and register it to Satellite. Once deployed, it exists in the Dev-Test Environment and currently subscribes to version 1.0 of our RHEL9-with-products Content View. The server is registered to Satellite and Red Hat Insights.
[root@bootc ~]# subscription-manager identity
system identity: 820ef0a5-cf5f-4bd9-9c84-e1275451cc0f
name: bootc.london.example.com
org name: Example Organization
org ID: Example_Organization
environment name: Dev-Test/RHEL9-with-products

[root@bootc ~]# insights-client --status
System is registered locally via .registered file. Registered at 2024-05-10T16:13:16.604481
Insights API confirms registration.
Before we move to image mode, let’s create a sample file to make sure we can access it after the switch.
[root@bootc ~]# mkdir /data
[root@bootc ~]# echo "hello from vm" >> /data/testfile
We now need to install podman and bootc on the server.
dnf install -y podman bootcA useful tool at this point is to confirm that podman can see the Satellite registry. As we set the repository to ‘unprotected’ when we created it, we do not need to supply any credentials to browse our repository. Let’s see what repositories are available on Satellite:
[root@bootc ~]# podman search satellite.london.example.com/
NAME DESCRIPTION
satellite.london.example.com/example_organization-dev-test-rhel9-with-products-rhel-bootc-rhel9_rhel-bootc
Great! We can see bootc. What tags are available to us?
[root@bootc ~]# podman search --list-tags satellite.london.example.com/example_organization-dev-test-rhel9-with-products-rhel-bootc-rhel9_rhel-bootc
NAME TAG
satellite.london.example.com/example_organization-dev-test-rhel9-with-products-rhel-bootc-rhel9_rhel-bootc 9.4-1714561838
Great, we can see the 9.4 tag we were expecting in our dev-test environment. We are now ready to switch our server into image mode using the above image. The following command does the magic for us. Note that we copy over our authorized_keys file from the host into the new container.
podman run -ti --rm --privileged -v /:/target \
--pid=host -v /var/lib/containers:/var/lib/containers \
-v /dev:/dev --security-opt label=type:unconfined_t satellite.london.example.com/example_organization-dev-test-rhel9-with-products-rhel-bootc-rhel9_rhel-bootc:9.4-1714561838 \
bootc install to-existing-root /target --skip-fetch-check \
--root-ssh-authorized-keys /target/root/.ssh/authorized_keys
Depending on whether Satellite has the image or needs to fetch it from the CDN will determine how long the above takes to run. When Satellite has it cached, it should take around a minute. The output looks like this:
Copying blob 50bc4423b9ec done |
Copying blob ad312c5c40cc done |
Copying blob bd9ddc54bea9 done |
Copying config fb2ac78c9d done |
Writing manifest to image destination
Installing image: docker://satellite.london.example.com/example_organization-dev-test-rhel9-with-products-rhel-bootc-rhel9_rhel-bootc:9.4-1714561838
Digest: sha256:fec8c52ba6d57b2331775581fd2b040c1efd2c335b97f8a2cd390b22188538df
Initializing ostree layout
Initializing sysroot
ostree/deploy/default initialized as OSTree stateroot
Deploying container image
Loading usr/lib/ostree/prepare-root.conf
Deployment complete
Injected: etc/tmpfiles.d/bootc-root-ssh.conf
Running bootupctl to install bootloader
Installed: grub.cfg
Installation complete!
Reboot the server to switch to Image Mode.
Examining the Image Mode environment
The server should now be running in image mode. First, let’s examine the status.
[root@bootc ~]# bootc status
apiVersion: org.containers.bootc/v1alpha1
kind: BootcHost
metadata:
  name: host
spec:
  image:
    image: satellite.london.example.com/example_organization-dev-test-rhel9-with-products-rhel-bootc-rhel9_rhel-bootc:9.4-1714561838
    transport: registry
  bootOrder: default
status:
  staged: null
  booted:
  image:
    image:
      image: satellite.london.example.com/example_organization-dev-test-rhel9-with-products-rhel-bootc-rhel9_rhel-bootc:9.4-1714561838
      transport: registry
    version: 9.20240501.0
    timestamp: null
    imageDigest: sha256:1b01a123af19126709c3e282247a675b75f0d746b9e64d52d3e698decc5359ff
    cachedUpdate: null
    incompatible: false
    pinned: false
    ostree:
      checksum: ac42007c4a11ee5516062c91d54dc10f59a84ac114790e8d56fc2a8844e6d05e
    deploySerial: 0
    rollback: null
    rollbackQueued: false
    type: bootcHost
Everything looks in order, it’s using the expected image. What does the filesystem look like on the server?
[root@bootc ~]# df -h
Filesystem      Size  Used Avail Use% Mounted on
devtmpfs        4.0M     0  4.0M   0% /dev
tmpfs           984M     0  984M   0% /dev/shm
tmpfs           394M  5.6M  389M   2% /run
/dev/vda4       8.8G  4.6G  4.3G  52% /sysroot
overlay         7.5M  7.5M     0 100% /
tmpfs           984M     0  984M   0% /tmp
/dev/vda3       960M  101M  860M  11% /boot
tmpfs           197M     0  197M   0% /run/user/0
We see that the root filesystem is of type overlay. We see that our old root filesystem is mounted as /sysroot and we can retrieve data from it.
[root@bootc ~]# cat /sysroot/data/testfile
hello from vm
Manage updates
This is where the environment looks different from a traditional RHEL install with Satellite. The bootc-fetch-apply-updates service and timer is scheduled to run on boot (plus a randomized delay) and then every eight hours (see /usr/lib/systemd/system/bootc-fetch-apply-updates.timer to view the schedule) . This means that if the image with the matching tag is updated in the Satellite Content View, the client will automatically fetch and apply this change. Note, this is a different mode of operation to traditional package mode RHEL where by default an end user (or automation) would use dnf update on the server to apply changes that have become available in the Content View.
[root@bootc ~]# systemctl status bootc-fetch-apply-updates.service
○ bootc-fetch-apply-updates.service - Apply bootc updates
Loaded: loaded (/usr/lib/systemd/system/bootc-fetch-apply-updates.service; static)
Active: inactive (dead)
TriggeredBy: ● bootc-fetch-apply-updates.timer
Docs: man:bootc(8)
[root@bootc ~]# systemctl status bootc-fetch-apply-updates.timer
● bootc-fetch-apply-updates.timer - Apply bootc updates
Loaded: loaded (/usr/lib/systemd/system/bootc-fetch-apply-updates.timer; disabled; preset: disabled)
Active: active (waiting) since Fri 2024-05-10 15:24:21 UTC; 1min 5s ago
Until: Fri 2024-05-10 15:24:21 UTC; 1min 5s ago
Trigger: Fri 2024-05-10 17:51:13 UTC; 2h 25min left
Triggers: ● bootc-fetch-apply-updates.service
Docs: man:bootc(8)

May 10 15:24:21 localhost systemd[1]: Started Apply bootc updates.
One option might be to mask the bootc-fetch-apply-updates.timer if you really don’t want the image mode servers to be automatically updated.
Summary
We’ve used our existing provisioning tooling to build a server and we have then switched it to Image Mode. The container image was pulled from Satellite using a version that was controlled using the built in Satellite lifecycle functionality. While this is useful for testing, the base rhel9/rhel-bootc is limited without layering in our application. It’s like we have deployed a package mode RHEL server but don’t have any applications running on it. Useful for a sysadmin to play with, but not something this business will care about. But we can fix that….
Whilst we can’t PUSH images to Satellite, we can leverage it’s mirroring capabilities so our next step will be build and create an application image container, push it to a registry and then have Satellite synchronise it and apply it within a lifecycle. We can also improve our provisioning process to deploy container mode image straight away (for example via Satellite’s kickstart or via a disk image) so we don’t deploy in the intermediate package mode configuration. We can also layer in the Red Hat Insights package and automate registration so we can see the servers using console.redhat.com that same way we do with package mode RHEL.
Next steps and links: