I recently needed to bring up a temporary RHEL 8 VM on my laptop so that I could do some testing. My laptop dual boots Fedora and RHEL and makes use of the free Red Hat Developer Subscription. In this instance I am doing all my work from that RHEL installation (RHEL 8 makes for a nice workstation by the way!). You can read more about the setup here. The requirements were fairly simple. Ideally, I wanted the very latest image so that I could try out some new features for a blog post. The VM doesn’t need to stay around for very long. I’d rather have a ‘standard’ OS image rather than a cut down container image such as the UBI. I don’t want to damage my base RHEL 8 install so anything I do can come and go. Let’s walk through how I set this up.
Preparation
The first thing I did on my RHEL 8 laptop was install the required packages. Note that I’ve installed virt-who so that I can take full advantage of the RHEL Developer Subscription if I need to use it later on and make sure my temporary VM can consume RHEL content. I install cockpit-machines so that if needed I can control the VMs from a web console.
[root@rhel8 ~] # dnf install cockpit-machines virt-viewer virt-install virt-whoMost of the time, I won’t be running Virtualization so I don’t need the Virtualization daemon to start at boot. This means I change the systemctl default, but make sure the daemon is running right now.
[root@rhel8 ~]# systemctl disable libvirtd
[root@rhel8 ~]# systemctl start libvirtd
[root@rhel8 ~]# systemctl status libvirtd
● libvirtd.service - Virtualization daemon
   Loaded: loaded (/usr/lib/systemd/system/libvirtd.service; disabled; vendor preset: enabled)
   Active: active (running) since Mon 2020-05-11 15:40:15 BST; 45min ago
     Docs: man:libvirtd(8)
           https://libvirt.org
 Main PID: 3678 (libvirtd)
    Tasks: 20 (limit: 32768)
   Memory: 58.7M
   CGroup: /system.slice/libvirtd.service
           ├─3678 /usr/sbin/libvirtd
           ├─3760 /usr/sbin/dnsmasq --conf-file=/var/lib/libvirt/dnsmasq/default.conf --leasefile-ro --dhcp-script=/usr/libexec>
           └─3761 /usr/sbin/dnsmasq --conf-file=/var/lib/libvirt/dnsmasq/default.conf --leasefile-ro --dhcp-script=/usr/libexec>
Obtain the software
Now that the service is running, I fetched the latest RHEL 8 QCOW image. Unfortunately, this isn’t available directly on https://developers.redhat.com/products/rhel/download but if you sign up, you can download it by logging in at https://access.redhat.com, clicking on ‘Downloads‘ from the top bar and selecting Red Hat Enterprise Linux 8. You’re looking for “Red Hat Enterprise Linux 8.2 Update KVM Guest Image”.
Generate a SHA256 checksum to make sure that the image has been downloaded correctly and compare it with the download page.
[root@rhel8 Downloads]# sha256sum rhel-8.2-x86_64-kvm.qcow2
8e34e57feb68d19ba9ffbefcd3f662b1a3437c9f7d811449c5ad452adda64384  rhel-8.2-x86_64-kvm.qcow2
The size of the image is just over 1GB.
Remember, I said that this VM is only going to be temporary. So, let’s copy the image over to /tmp.
[root@rhel8 Downloads]# cp /path/to/rhel-8.2-x86_64-kvm.qcow2 /tmpCustomizing the QCOW RHEL 8 image
Unfortunately, we can’t use the image straight away. Firstly, we don’t know the passwords and secondly when it boots it will attempt to use cloud-init to configure itself. The basic idea is that we customise this image using something along the lines of:
[root@rhel8 tmp]# virt-customize -a rhel-8.2-x86_64-kvm.qcow2 --root-password password:mypassword --uninstall cloud-initThe above will update the RHEL 8 image and set the root password to ‘mypassword’ and uninstall the ‘cloud-init’ package.
There are many other options to virt-customize – it’s really straightforward to tailor it to your requirements. Here’s a quick script that does the following:
- Take the base RHEL 8.2 QCOW image and copy it to a ‘template’
- Set a custom root password
- Uninstall the cloud-init package
- Set the timezone to “Europe/London”
- Register the ‘template’ with Red Hat
- Attach a subscription
- Perform an update of the packages
- Unregister from Red Hat
- Relabel files with correct SELinux labels
#!/bin/bash
SOURCE=/tmp/rhel-8.2-x86_64-kvm.qcow2
DEST_DIR=/tmp
TEMPLATE=mytemplate.qcow2

# Set password, uninstall cloud-init. set timezone
# Register with Red Hat, Update, Unregister with Red Hat
# Relabel files with correct SELinux labels
cp -pv ${SOURCE} ${DEST_DIR}/${TEMPLATE}
virt-customize -a ${DEST_DIR}/${TEMPLATE} \
--root-password password:mypassword \
--uninstall cloud-init \
--timezone "Europe/London" \
--sm-credentials 'USERNAME:password:MY_REDHAT_PASSWD' \
--sm-register \
--sm-attach auto \
--update \
--sm-unregister \
--selinux-relabel

cat << EOF |
guest01
guest02
guest03
EOF

while read SERVER
do
        cp -pv $TEMPLATE $DEST_DIR/${SERVER}.qcow2
        virt-customize -a $DEST_DIR/${SERVER}.qcow2 \
        --hostname ${SERVER}
done
You can add and remove options according to your environment. Don’t forget to also alter USERNAME and MY_REDHAT_PASSWD or better still prompt for the values when running the script and/or read in the values from a file.
Starting the virtual machines
Now the images are created we can boot them:
#!/bin/bash
DEST_DIR=/tmp
cat << EOF |
guest01
guest02
guest03
EOF

while read SERVER
do
        virt-install --name ${SERVER} --memory 2048 --vcpu 1 --disk ${DEST_DIR}/${SERVER}.qcow2 --import --os-variant rhel8.2 &
done
The servers will boot and get a DHCP lease from the default pool. To see the IP addresses assigned to your machines you can use virsh net-dhcp-leases default:
[root@rhel8 tmp]# virsh net-dhcp-leases default
 Expiry Time          MAC address        Protocol  IP address                Hostname        Client ID or DUID
-------------------------------------------------------------------------------------------------------------------
 2020-05-11 17:59:06  52:54:00:17:f1:c0  ipv4      192.168.122.90/24         -               01:52:54:00:17:f1:c0
 2020-05-11 18:33:15  52:54:00:46:22:83  ipv4      192.168.122.49/24         guest03         01:52:54:00:46:22:83
 2020-05-11 18:31:50  52:54:00:61:97:a2  ipv4      192.168.122.51/24         guest01         01:52:54:00:61:97:a2
 2020-05-11 18:33:15  52:54:00:76:36:53  ipv4      192.168.122.216/24        guest02         01:52:54:00:76:36:53
You should be able to ssh directly to the machines as root.
You can verify your machines have been patched by looking at the rpm database and examining the most recent updates. Those installed recently will be at the top. For fun, you can also see when Red Hat created the QCOW image – in this case it was on 23 April 2020, around a week before the formal release.
[root@guest02 ~]# rpm -qa --last | head -20
openldap-2.4.46-11.el8_1.x86_64               Mon 11 May 2020 17:28:46 BST
tzdata-2020a-1.el8.noarch                     Mon 11 May 2020 17:28:45 BST
rhnsd-5.0.35-3.module+el8+2754+6a08e8f4.x86_64 Mon 11 May 2020 17:28:45 BST
insights-client-3.0.13-1.el8_1.noarch         Mon 11 May 2020 17:28:45 BST
gnutls-3.6.8-10.el8_2.x86_64                  Mon 11 May 2020 17:28:45 BST
coreutils-8.30-6.el8_1.1.x86_64               Mon 11 May 2020 17:28:45 BST
coreutils-common-8.30-6.el8_1.1.x86_64        Mon 11 May 2020 17:28:44 BST
gpg-pubkey-fd431d51-4ae0493b                  Mon 11 May 2020 17:28:43 BST
gpg-pubkey-d4082792-5b32db75                  Mon 11 May 2020 17:28:43 BST
sg3_utils-1.44-5.el8.x86_64                   Thu 23 Apr 2020 06:14:54 BST
rsync-3.1.3-7.el8.x86_64                      Thu 23 Apr 2020 06:14:54 BST
rootfiles-8.1-22.el8.noarch                   Thu 23 Apr 2020 06:14:54 BST
man-db-2.7.6.1-17.el8.x86_64                  Thu 23 Apr 2020 06:14:54 BST
lsscsi-0.30-1.el8.x86_64                      Thu 23 Apr 2020 06:14:54 BST
lshw-B.02.18-23.el8.x86_64                    Thu 23 Apr 2020 06:14:54 BST
hostname-3.20-6.el8.x86_64                    Thu 23 Apr 2020 06:14:54 BST
dosfstools-4.1-6.el8.x86_64                   Thu 23 Apr 2020 06:14:54 BST
sudo-1.8.29-5.el8.x86_64                      Thu 23 Apr 2020 06:14:53 BST
prefixdevname-0.1.0-6.el8.x86_64              Thu 23 Apr 2020 06:14:53 BST
parted-3.2-38.el8.x86_64                      Thu 23 Apr 2020 06:14:53 BST
A note about the size of the VM that’s been created, your VM will have just over 1GB of space in the root filesystem. For quick testing this is sufficient.
[root@guest02 ~]# df -hP
Filesystem      Size  Used Avail Use% Mounted on
devtmpfs        898M     0  898M   0% /dev
tmpfs           914M     0  914M   0% /dev/shm
tmpfs           914M   17M  897M   2% /run
tmpfs           914M     0  914M   0% /sys/fs/cgroup
/dev/vda3       9.9G  1.4G  8.6G  14% /
/dev/vda2       100M  6.8M   94M   7% /boot/efi
tmpfs           183M     0  183M   0% /run/user/0
Registering with Red Hat
Now that the these guests are running, we can register them with Red Hat using subscription-manager. As these are all guest of our laptop hypervisor, we can run the following on our laptop (assuming it is registered with the portal).
[root@rhel8 /tmp] virt-whoThis will associate the VMs with your laptop. If you now visit the ‘Systems’ area of the Red Hat portal, should find your guests are listed under the physical system in the details tab.
Starting and stopping KVM servers
Use the virsh start and virsh stop commands to start and stop the KVM servers. For example:
[root@rhel8 /tmp] virsh start guest01If you need to connect to the console of the guest you can use the virt-viewer command with a syntax such as:
[root@rhel8 /tmp] virt-viewer --connect qemu:///system guest01Cleaning up
To terminate the instances when you are done with them, you can either run systemctl poweroff from within the VM or perform the following:
virsh destroy hostnameTo permanently remove the guest, use the following syntax:
virsh undefine hostnameSample output from the creation script:
'/tmp/rhel-8.2-x86_64-kvm.qcow2' -> '/tmp/mytemplate.qcow2'
[ 0.0] Examining the guest ...
[ 4.6] Setting a random seed
[ 4.6] Setting the machine ID in /etc/machine-id
[ 4.6] Uninstalling packages: cloud-init
[ 7.6] Setting the timezone: Europe/London
[ 7.6] Registering with subscription-manager
[ 39.3] Attaching to compatible subscriptions
[ 74.1] Updating packages
[ 149.5] Unregistering with subscription-manager
[ 152.1] Setting passwords
[ 153.2] SELinux relabelling
[ 163.2] Finishing off
'mytemplate.qcow2' -> '/tmp/guest01.qcow2'
[ 0.0] Examining the guest ...
[ 4.7] Setting a random seed
[ 4.7] Setting the hostname: guest01
[ 4.8] Finishing off
'mytemplate.qcow2' -> '/tmp/guest02.qcow2'
[ 0.0] Examining the guest ...
[ 4.6] Setting a random seed
[ 4.6] Setting the hostname: guest02
[ 4.6] Finishing off
'mytemplate.qcow2' -> '/tmp/guest03.qcow2'
[ 0.0] Examining the guest ...
[ 4.6] Setting a random seed
[ 4.6] Setting the hostname: guest03
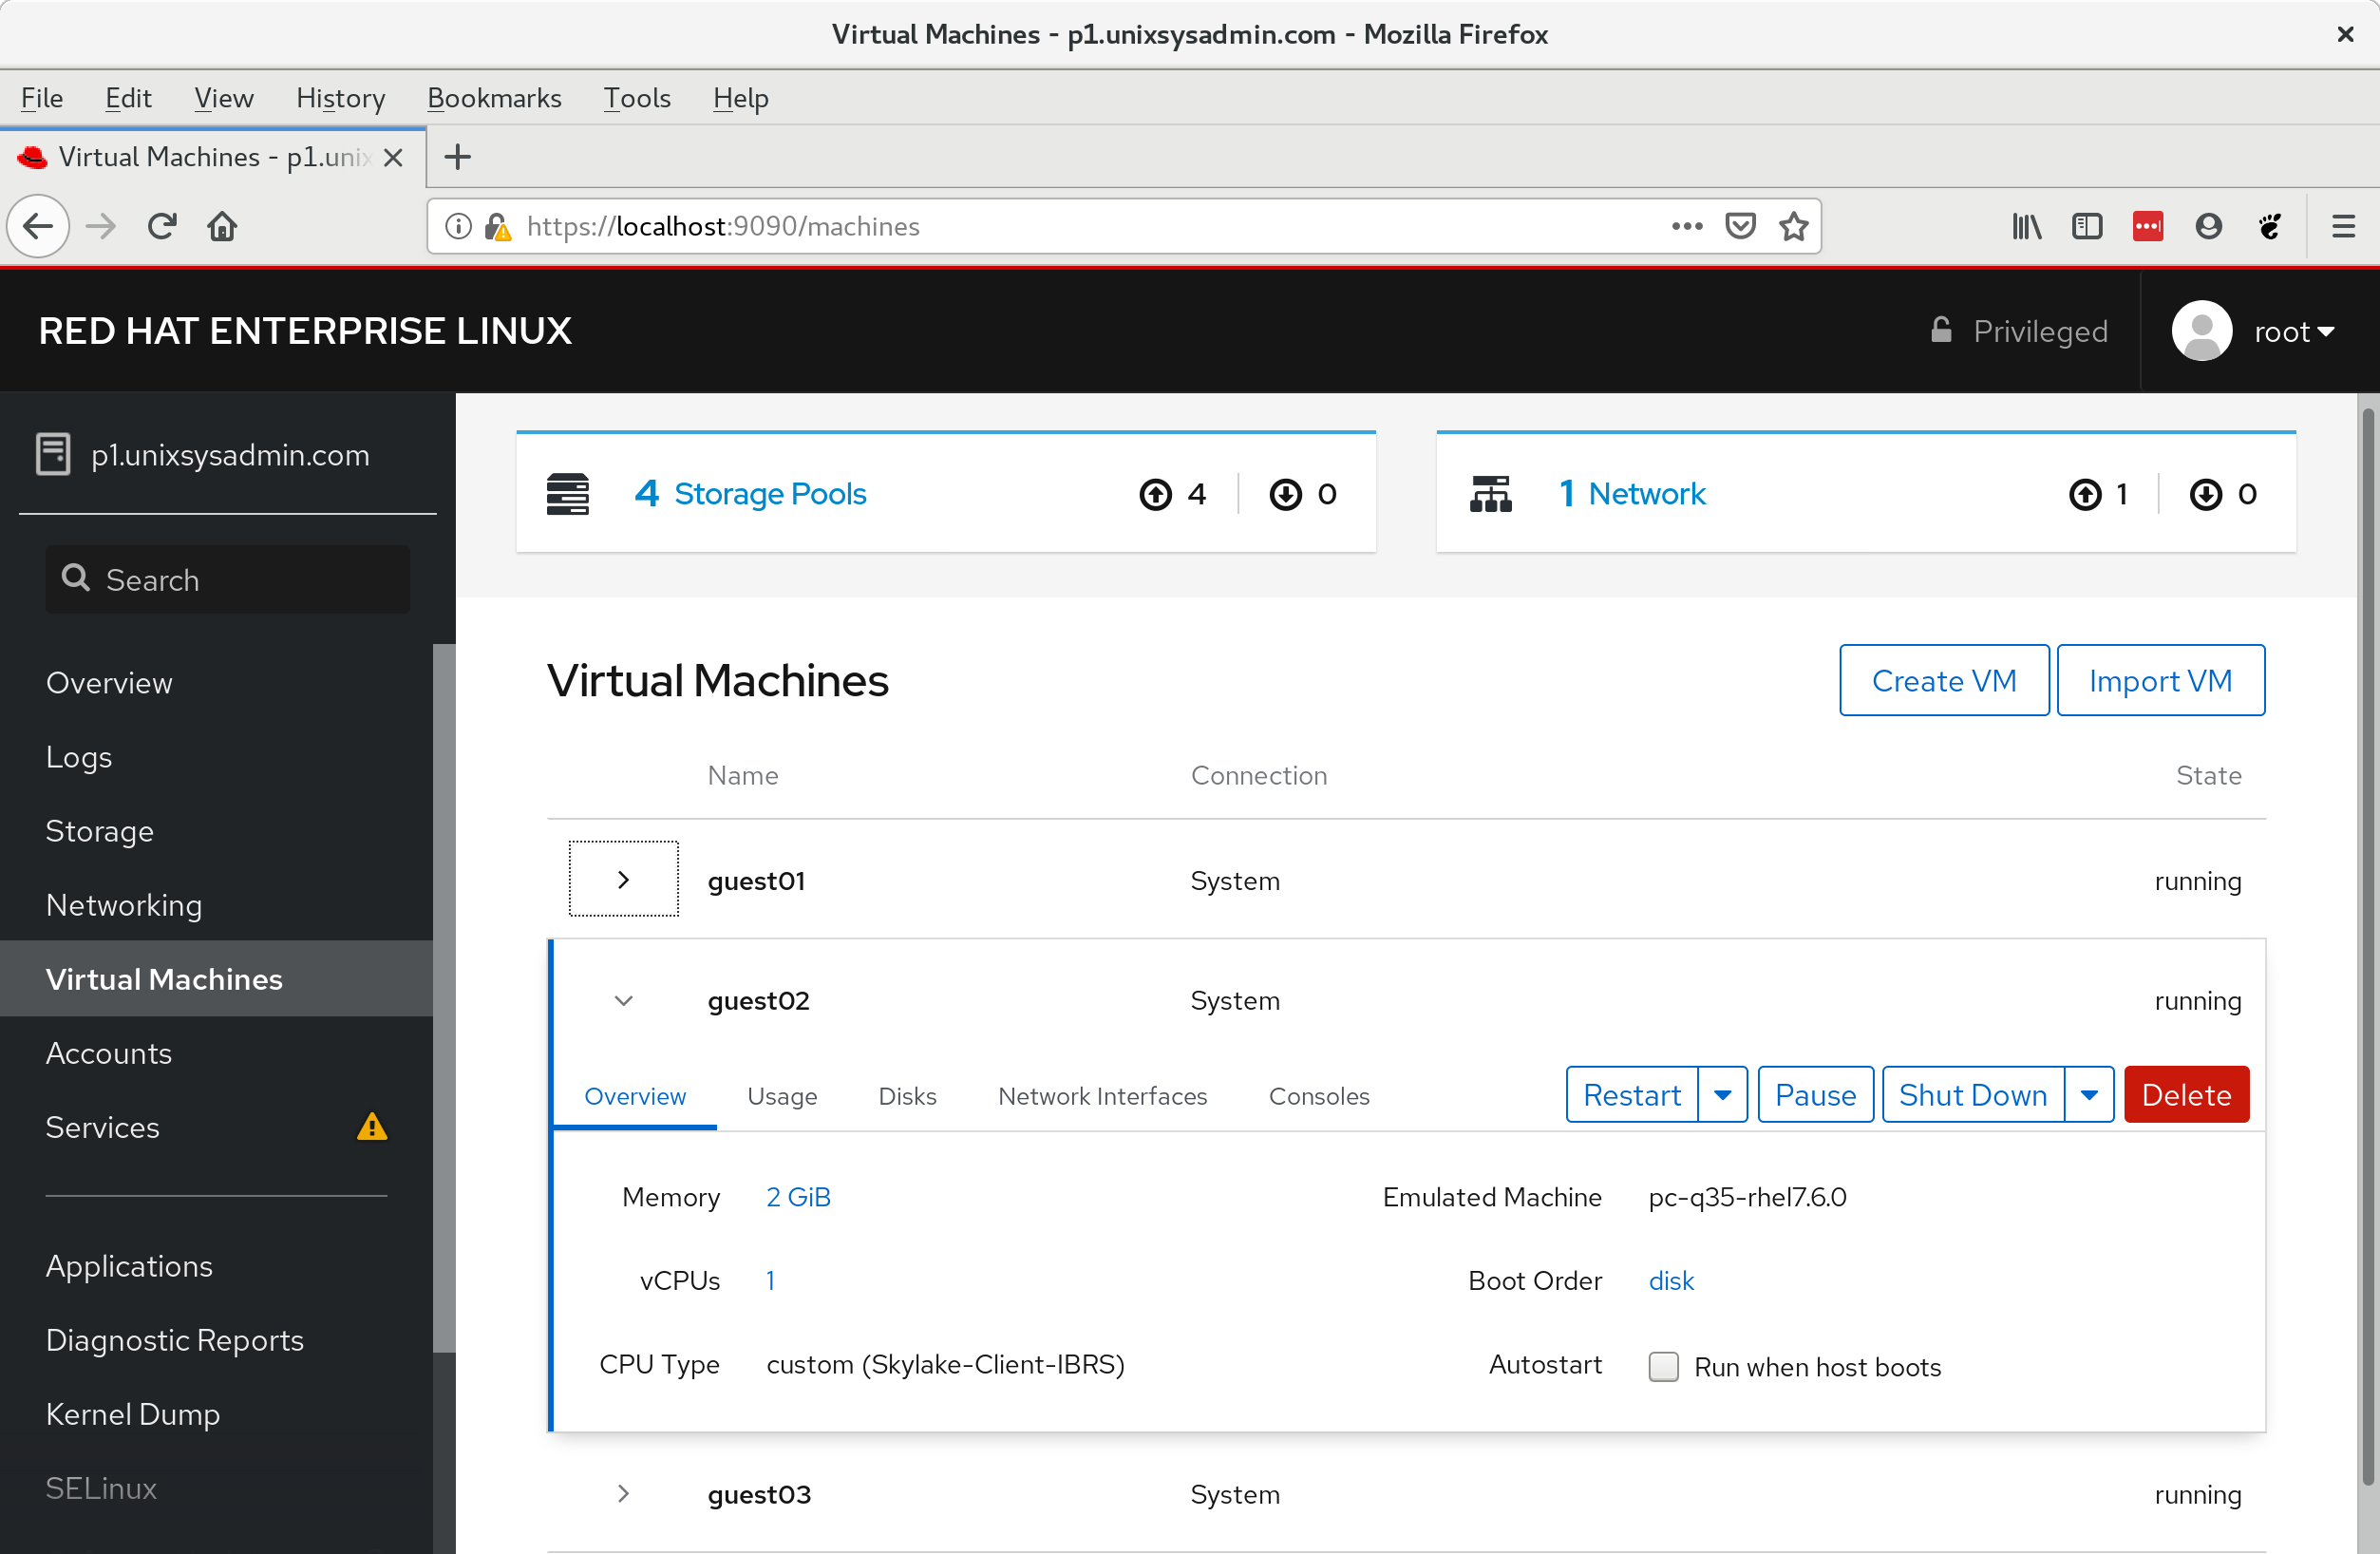
[ 4.6] Finishing offFinally, it’s worth noting that if you would like to, it’s possible to manage the VMs using the cockpit interface, which replaces virt-manager. To do this, start the cockpit service.
[root@rhel8 tmp]# systemctl start cockpitThen navigate with your browser to https://localhost:8080. You can login with your desktop login credentials or directly as root. You will see your virtual machines by following the link on the left hand side – it should look like the screenshot on this page.
Conclusion and links
Being able to quickly bring up the latest RHEL 8 images is really useful for testing and it’s easy to adjust the installations to your requirements. Note that I’ve performed the above tasks on RHEL 8, but you can likely do this on Centos 8 and Fedora. Useful links:
Mentions