Following on from the successful RHEL8 on a ThinkPad P1, Fedora 29 on a ThinkPad P1 and Fedora 30 on a ThinkPad P1 installations I thought I would do a quick post on installing Fedora 32 on the ThinkPad P1.
Before we begin, a couple of Fedora 32 resources which may be useful:
ThinkPad P1 Specifications
As a reminder, here are the specifications of my ThinkPad P1:
- ThinkPad P1 model 20MDCTO1WW
- Intel(R) Xeon(R) E-2176M CPU @ 2.70GHz
- 1 x 32 GB SODIMM, DDR4, Speed: 2667 MT/s, Manufacturer: Samsung, Part Number: M471A4G43MB1-CTD
- 1 TB NVME drive SAMSUNG MZVLB1T0HALR-000L7
- Graphics NVIDIA Corporation GP107GLM [Quadro P2000 Mobile]
- 4K UHD Display
- BIOS version N2EET42W (1.24)
- Embedded Controller Version N2EHT25W (1.10)
- Battery Design Capacity: 80400 mWh
Note: in late 2018, there were reports that changing between discrete and hybrid graphics or changing the Thunderbolt settings caused issues. This seems to be dependent on the version of BIOS being used. Reference: Reddit thread: New BIOS to fix bricks and thermal issues for X1/P1 series from Lenovo. It is recommended to check your BIOS for updates before changing BIOS settings. Additional references:
- Thinkpad X1 Extreme Black Screen Help
- Reddit thread: WARNING – Do not change from “hybrid graphics” to “discrete graphics” in BIOS
It’s also worth mentioning that Fedora 32 will be available pre-installed on some models such as the P1 (2nd generation). See Coming Soon: Fedora on Lenovo laptops!
Fresh Install or Upgrade?
Fedora has offered upgrades between releases for quite some time. In my case, I tend to prefer a clean install to get rid of any cruft that may have built up since the last release. Everything important is backed up after all, right? And modern tools such as Ansible, Puppet, Git and shell scripts can bring the your system back to a known state. Another benefit (depending on your point of view!) is you can check out the newer installer options which somewhere down the line will end up in enterprise distributions like RHEL.
Install Media
Using my existing Fedora installation, I created a Live USB of Fedora 32 workstation:
sudo dd if=/path/to/Fedora-Workstation-Live-x86_64-32-1.6.isoimage.iso of=/dev/sdX bs=8M status=progress oflag=direct
where /dev/sdX is the path to a USB disk. Remember, all content on the USB will be wiped!
You should also verify the sha256sum of the ISO image by comparing the output of
sha256sum Fedora-Workstation-Live-x86_64-32-1.6.iso
with the value found at https://getfedora.org/static/checksums/Fedora-Workstation-32-1.6-x86_64-CHECKSUM
Installation settings
For the install, I did not hook up a monitor to the ThinkPad P1. My BIOS settings were as follows:
- BIOS version N2EET42W (1.24)
- Config -> Display -> Hybrid Graphics
- Security -> Secure Boot -> Enabled
Installation
Booting from the USB with the default options I proceeded to first setup my network (wired and wireless). I set the hostname by searching for “About” (View information about your system) before clicking on the “Install to Hard Drive” option to begin the installer. Remember, if you chose custom partitioning, you probably want to set /boot/efi as /dev/nvme0n1p1 or whatever, but DO NOT format it if you plan to boot multiple operating systems. Once complete, select Power Off from the menu and remove the USB device. Unlike my Fedora 30 on a ThinkPad P1 installation, the laptop shutdown gracefully, with no “A stop job is running for the Login Service”.
The first reboot gave me a ‘flicker free boot’ – very nice!
After entering details in the gnome-initial-setup screen I was presented with a welcome screen.
Out of the box experience
Fedora 32 out of the box ‘just worked’ in my case, with no need to switch to the dedicated NVidia drivers. The graphics are crisp, transitions from the login and lock screens very smooth. The only slight nag was that under the battery gauge in the top right of the screen it said ‘estimating’ when plugged in to mains power.
Other notes on this configuration:
- Secure Boot means that the Operating System code launched by the firmware is trusted
- Hybrid graphics means when booting into Windows we can use the intel graphics for non-intensive work – we can keep the same BIOS setting for both environments
- Graphics are seen as:
[user@p1 ~]$ lspci | grep -e VGA

00:02.0 VGA compatible controller: Intel Corporation Device 3e94

01:00.0 VGA compatible controller: NVIDIA Corporation GP107GLM [Quadro P2000 Mobile] (rev a1) - We are using Wayland rather than xorg:
[user@p1 ~] echo $XDG_SESSION_TYPE
wayland - We are using the i915 / nouveau drivers
[user@p1 ~] lspci -nnk | grep -iA2 vga00:02.0 VGA compatible controller [0300]: Intel Corporation Device [8086:3e94]
Subsystem: Lenovo Device [17aa:2267]
Kernel driver in use: i915
--
01:00.0 VGA compatible controller [0300]: NVIDIA Corporation GP107GLM [Quadro P2000 Mobile] [10de:1cba] (rev a1)
Subsystem: Lenovo Device [17aa:2267]
Kernel driver in use: nouveau
[user@p1 ~]$ lspci | grep -e VGA
00:02.0 VGA compatible controller: Intel Corporation Device 3e94
01:00.0 VGA compatible controller: NVIDIA Corporation GP107GLM [Quadro P2000 Mobile] (rev a1)
Boot tweak
The following modification is not necessary but something that the sysadmin inside of me likes to do. As the server laptop boots I prefer to see the boot messages. To enable that we need to remove the ‘acpi=off rhgb quiet’ entries from the EFI menu when new kernels are installed.
Edit /etc/default/grub and identify the GRUB_CMDLINE_LINUX stanza which should read something like this:
GRUB_CMDLINE_LINUX="resume=UUID=a8b47a6f-1223-42aa-8b73-5c922cee1901 rhgb quiet"
Remove the unwanted entries rhgb quiet
To make this change take effect with all existing kernels that have been installed:
grubby --update-kernel=ALL --remove-args="rhgb quiet"
Verify /boot/efi/EFI/fedora/grubenv is as expected and optionally reboot.
Kernel updates
The Fedora 32 live image shipped with 5.6.6-300.fc32.x86_64 but a ‘dnf update’ at the time of writing brought this to 5.6.7-300.fc32.x86_64.
dnf update kernel
Default settings
At this point, we are running the standard Fedora distribution without proprietary drivers and have the Advanced Configuration and Power Interface (ACPI) on. If you want to install the Nvidia drivers, then you can likely follow the guide I used for Fedora 30 on a ThinkPad P1. Be aware though, that you’ll need to disable Secure Boot so that the Nvidia modules can be loaded.
Power Management
TLP – Linux Advanced Power Management can enhance the battery life on the ThinkPad P1. The installation is fairly straightforward. To begin, install tlp and smartmontools from the standard Fedora repos:
dnf install tlp smartmontools
The default configuration files for TLP have changed since Fedora 31. There is now a default configuration file in:
/etc/tlp.conf
Custom values are intented to be placed in /etc/tlp.d/*.conf
I personally like to change the battery charge thresholds, so I perform the following:echo START_CHARGE_THRESH_BAT0=40 >> /etc/tlp.d/custom.conf
echo STOP_CHARGE_THRESH_BAT0=45 >> /etc/tlp.d/custom.conf
The above is a good option if the ThinkPad is mainly used at a desk with a plugged in power supply. This should extend the life of the battery. The drawback is that if you need to charge the battery to 100% so you can work without the power supply, you’ll have to stop the TLP service or alter the settings.
Enable the service and start it at boot time:
systemctl enable --now tlp.service
To monitor the TLP service:tlp-stat
To see the battery status:tlp-stat -b
Hot Stuff
One drawback on the default installation is that the fans kick in a lot when the laptop is doing any basic task. When idle, it seems fine but open a browser or watch a video and the noise is somewhat noticeable. At first I went into the BIOS and changed the following:
Adaptive Thermal Management, Scheme for AC: Balanced (it was set to Maximum Performance)
However this didn’t make a noticeable difference. The processors on the P1 are really powerful and I don’t need them at full speed just to watch a video.
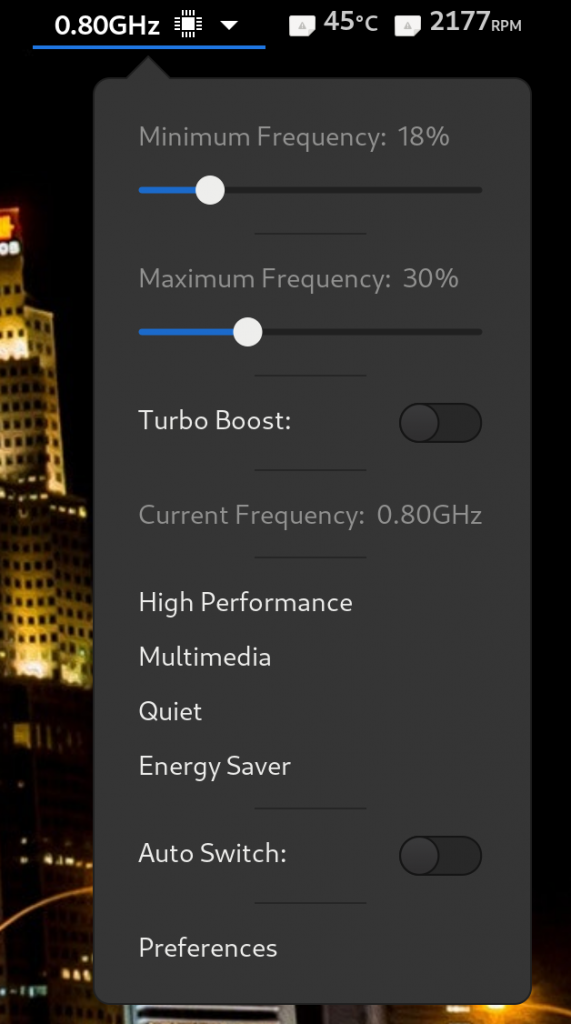
Enter the following two Gnome extensions:
CPU Power Manager
Thinkpad Thermal
These two extensions give you the ability to control the CPU performance and monitor CPU temperatures and fan speeds. With this, you can limit the CPU without noticeable performance which in turn means the fans don’t kick in. Visually, the tools are pretty cool too:

Summary
Fedora 32 now works really well out of the box and there is no need to install the Nvidia drivers if you don’t want to. A few simple tweaks such as installing TLP and altering the CPU profiles leaves you with a great workstation.
Useful resources
- Hardware Issues with Fedora 28 on Lenovo P52
- Arch Wiki Lenovo ThinkPad P1
- Reddit thread: ThinkPad P1 running Arch Linux incl link to fingerprint reader solution
- RPM Fusion NVIDIA drivers documentation
- Reddit thread: Beware BIOS 1.15 for P1!!! Thermal cap now at 80c : thinkpad
- Fedora 28 on a ThinkPad P1
- Fedora on a ThinkPad P1
- Fedora 30 on a ThinkPad P1