
Update 1/May/2020: you might also be interested in Fedora 32 on a ThinkPad P1 (Fedora 32 works very well without the Nvidia drivers, plus I’ve added some tips on cooling)
Following on from the successful RHEL8 on a ThinkPad P1 and Fedora 29 on a ThinkPad P1 installations I thought I would do a quick post on installing Fedora 30 on the ThinkPad P1.
Before we begin, a couple of Fedora 30 resources which may be useful:
ThinkPad P1 Specifications
As a reminder, here are the specifications of my ThinkPad P1:
- ThinkPad P1 model 20MDCTO1WW
- Intel(R) Xeon(R) E-2176M CPU @ 2.70GHz
- 1 x 32 GB SODIMM, DDR4, Speed: 2667 MT/s, Manufacturer: Samsung, Part Number: M471A4G43MB1-CTD
- 1 TB NVME drive SAMSUNG MZVLB1T0HALR-000L7
- Graphics NVIDIA Corporation GP107GLM [Quadro P2000 Mobile]
- 4K UHD Display
- BIOS version N2EET37W (1.19)
- Embedded Controller Version N2EHT25W (1.10)
- Battery Design Capacity: 80400 mWh
Note: in late 2018, there were reports that changing between discrete and hybrid graphics or changing the Thunderbolt settings caused issues. This seems to be dependent on the version of BIOS being used. Reference: Reddit thread: New BIOS to fix bricks and thermal issues for X1/P1 series from Lenovo. It is recommended to check your BIOS for updates before changing BIOS settings. Additional references:
- Thinkpad X1 Extreme Black Screen Help
- Reddit thread: WARNING – Do not change from “hybrid graphics” to “discrete graphics” in BIOS
Fresh Install or Upgrade?
Fedora has offered upgrades between releases for quite some time. In my case, I tend to prefer a clean install to get rid of any cruft that may have built up since the last release. Everything important is backed up after all, right? And modern tools such as Ansible, Puppet, Git and shell scripts can bring the your system back to a known state. Another benefit (depending on your point of view!) is you can check out the newer installer options which somewhere down the line will end up in enterprise distributions like RHEL.
Install Media
Using my existing Fedora installation, I created a Live USB of Fedora 30 workstation:
sudo dd if=/path/to/Fedora-Workstation-Live-x86_64-30-1.2.isoimage.iso of=/dev/sdX bs=8M status=progress oflag=direct
where /dev/sdX is the path to a USB disk. Remember, all content on the USB will be wiped!
Installation settings
For the install, I did not hook up a monitor to the ThinkPad P1. My BIOS settings were as follows:
- BIOS version N2EET37W (1.19)
- Config -> Display -> Hybrid Graphics
- Security -> Secure Boot -> Enabled
Install One
Booting from the USB with the default options I proceeded to first setup my network (wired and wireless). I set the hostname by searching for “About” (View information about your system) before clicking on the “Install to Hard Drive” option to begin the installer. Remember, if you chose custom partitioning, you probably want to set /boot/efi as /dev/nvme0n1p1 or whatever, but DO NOT format it if you plan to boot multiple operating systems. Once complete, I selected Power Off from the menu but the laptop took a while to shutdown. “A stop job is running for the Login Service” was shown and the delay timeout went form 90 seconds, to 3 minutes to 6 minutes. I eventually powered off with the physical power button.
The first reboot gave me ‘flicker free boot’ – nice!
However, after entering my details in the gnome-initial-setup screen I was presented with a screen with the wallpaper showing. Use of the power button in Gnome nothing happened.
Working Install
Whilst I probably could have rebooted with “acpi=off” as a kernel option, I decided to perform another install using the following approach instead:
- BIOS: Secure Boot Enabled
- BIOS: Hybrid Graphics Enabled
- Boot from the USB, select “Start Fedora-WorkStation-Live 30” and press ‘e’ to edit the boot options
- Remove the ‘quiet’ option on the linuxefi line
- Add the argument acpi=off on the linuxefi line
- Hit ‘Ctrl’ and ‘x’ to boot with those options.
Notes on this selection:
- Removing the ‘quiet’ option is a personal preference, but it can be useful to catch errors when Fedora boots
- Hybrid graphics means when booting into Windows we can use the intel graphics for non-intensive work – we can keep the same BIOS setting for both environments
- Graphics are seen as:
[user@p1 ~]$ lspci | grep -e VGA

00:02.0 VGA compatible controller: Intel Corporation Device 3e94

01:00.0 VGA compatible controller: NVIDIA Corporation GP107GLM [Quadro P2000 Mobile] (rev a1)
As before, I proceeded to first setup my network (wired and wireless) and set the hostname before clicking on the “Install to Hard Drive” option to begin the installer.
Kernel updates
The Fedora 30 live image shipped with 5.0.9-301.fc30.x86_64 but a ‘dnf update’ at the time of writing brought this to 5.0.10-300.fc30.x86_64.
dnf update kernel
Default settings
At this point, we are running the standard Fedora distribution without proprietary drivers but we have the Advanced Configuration and Power Interface (ACPI) off. If you don’t care about battery life (you are running on mains power) then this may be good enough for you. Note that you’ll probably need to power off your laptop via the power button when doing a shutdown.
Install the NVIDIA drivers
My preference is to first install the NVIDIA drivers, reboot and then re-enable the ACPI setting. This allows me to keep BIOS settings to ‘hybrid graphics’ so that the integrated GPU can be used when I boot back into Windows, but I get the benefits of proper power management in Fedora.
One downside of this, you must disable Secure Boot – RPM Fusion – NVIDIA Howto
So, before proceeding, go back to BIOS and DISABLE SECURE BOOT.
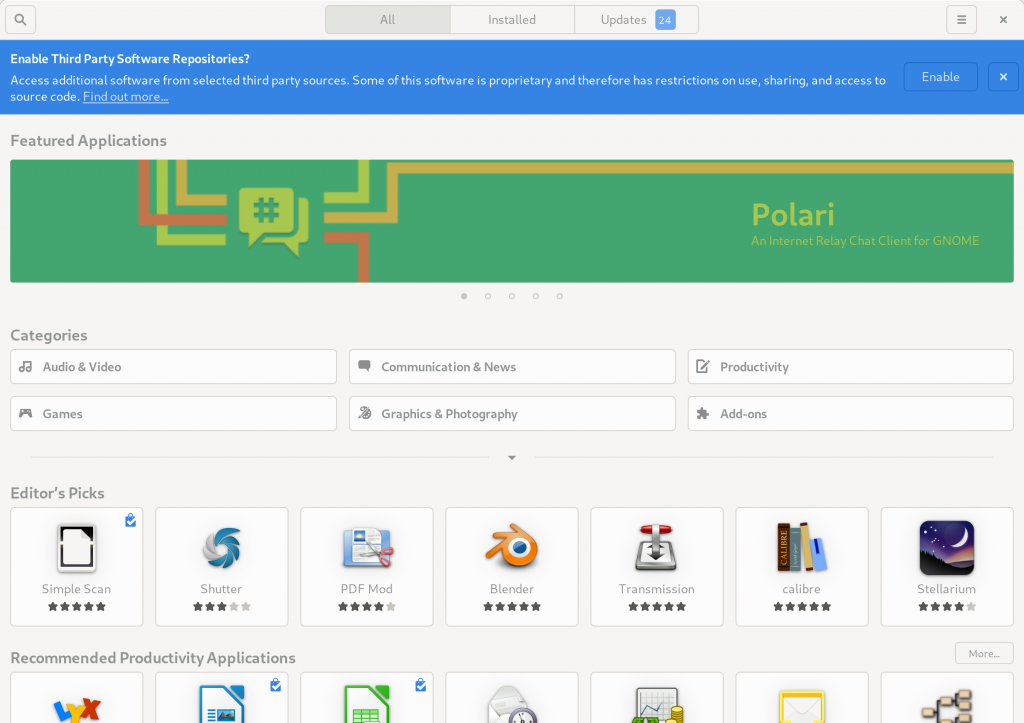
Launching ‘Software’ in Gnome for the first time should prompt you to confirm whether you want to enable Fedora Third Party Software Repositories.
In the event that this doesn’t appear you can run the following command which adds the required repositories in /etc/yum.repos.d.
sudo dnf install fedora-workstation-repositories.noarch
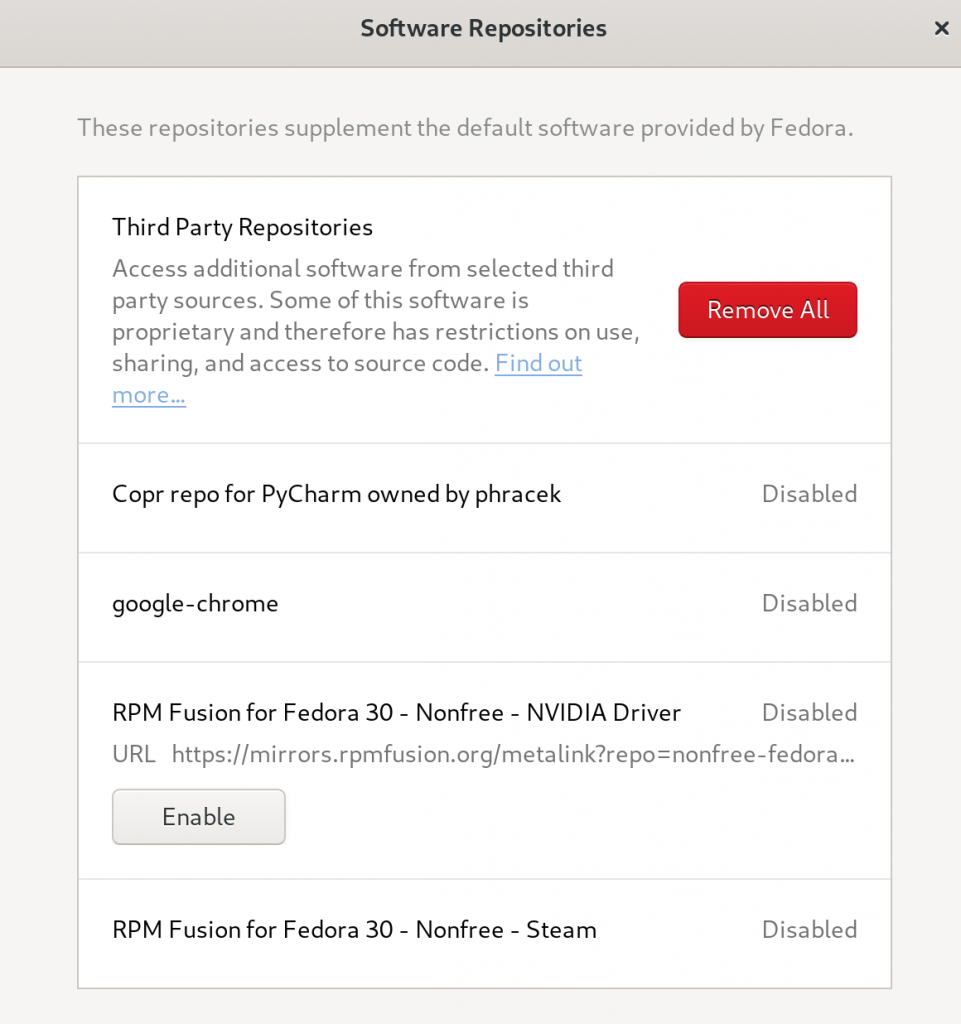
Enable the “RPM Fusion for Fedora 30 – Nonfree – NVIDIA Driver” repository by clicking on the menu icon on the right hand side of the Software utility.
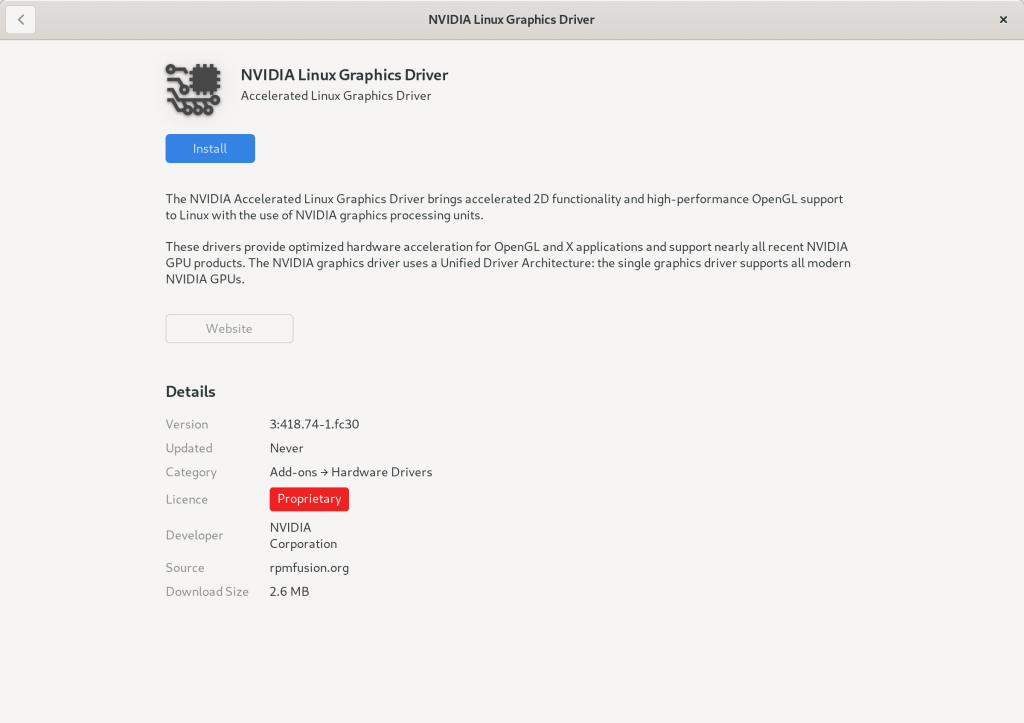
Search for ‘nvidia’ in the software window and the ‘NVIDIA Linux Graphics Driver’ should be listed. (Note, I could not see this at first, but a reboot made this available – there’s probably a way to refresh the cache that software utility is using).

Select the NVIDIA Linux Graphics Driver. The following will appear giving some details about the package and the source – RPM Fusion:
The installer does the following:
- Add rd.driver.blacklist=nouveau modprobe.blacklist=nouveau nvidia-drm.modeset=1 to the kernel boot options
- Compiles the NVIDIA kernel modules and installs them into
/usr/lib/modules/5.0.9-301.fc30.x86_64/extra

/usr/lib/modules/5.0.9-301.fc30.x86_64/extra/nvidia

/usr/lib/modules/5.0.9-301.fc30.x86_64/extra/nvidia/nvidia-drm.ko

/usr/lib/modules/5.0.9-301.fc30.x86_64/extra/nvidia/nvidia-modeset.ko

/usr/lib/modules/5.0.9-301.fc30.x86_64/extra/nvidia/nvidia-uvm.ko

/usr/lib/modules/5.0.9-301.fc30.x86_64/extra/nvidia/nvidia.ko
It’s worth checking these files exist before proceeding (the exact path might change if you are running a different kernel). If they don’t, make sure that the version of the kernel-devel package that’s installed matches your running kernel (dnf install kernel-devel-5.0.9.301-fc30 for the example above) and then run “akmods –force”. Also verify with:
-
rpm -qa --last | head
kmod-nvidia-5.0.9-301.fc30.x86_64-418.74-1.fc30.x86_64
I proceeded to reboot the laptop – first with the ‘acpi=off rhgb quiet‘ options and then without them. Both options allowed me to boot into the graphical desktop and removing the acpi=off flag allows all the CPUs to become visible and the power management functionality works correctly – battery levels, brightness levels with the function keys, etc.
Remove the acpi=off flag
Fedora 30 now uses the Bootloader Spec so the method for changing kernel options has changed. See Setting kernel command line arguments with Fedora 30 for more details.
To remove the ‘acpi=off rhgb quiet’ entries from the EFI menu when new kernels are installed the following is performed:
Edit /etc/default/grub and identify the GRUB_CMDLINE_LINUX stanza which should read something like this:
GRUB_CMDLINE_LINUX="rd.driver.blacklist=nouveau modprobe.blacklist=nouveau nvidia-drm.modeset=1 resume=UUID=a8b47a6f-1223-42aa-8b73-5c922cee1901 acpi=off rhgb quiet"
Remove the unwanted entries acpi=off rhgb quiet
To make this change take effect with all existing kernels that have been installed:
grubby --update-kernel=ALL --remove-args="acpi=off rhgb quiet"
Verify /boot/efi/EFI/fedora/grubenv is as expected and optionally reboot. Note that I chose to remove the rhgb and quiet options from the boot loader. This generates extra message on the console but these can sometimes be useful.
Kernel Updates with NVIDIA
The kernel modules with the NVIDIA driver must be rebuilt with each kernel update. Using the NVIDIA packages from the RPM Fusion repository we installed from the Gnome Software Application takes care of this for us.
I was initially running kernel 5.0.9-301.fc30.x86_64 but 5.0.16-300.fc30.x86_64 was available. Perform the update as normal:
sudo dnf update
After the update completes, the Akmods daemon builds the NVIDIA package for the new kernel. In this case, it places it in the following directory:# ls -l /usr/lib/modules/5.0.16-300.fc30.x86_64/extra/nvidia/
total 27512
-rw-r--r--. 1 root root 97728 May 23 16:30 nvidia-drm.ko
-rw-r--r--. 1 root root 24763728 May 23 16:30 nvidia.ko
-rw-r--r--. 1 root root 1446472 May 23 16:30 nvidia-modeset.ko
-rw-r--r--. 1 root root 1857736 May 23 16:30 nvidia-uvm.ko
Important: after the dnf command completes it will take a short time (less than a minute) to compile the module. Do not reboot until this process completes.
Power Management
TLP – Linux Advanced Power Management can enhance the battery life on the ThinkPad P1. The installation is fairly straightforward. To begin, install tlp and smartmontools from the standard Fedora repos:
dnf install tlp smartmontools
Take a backup of the default TLP configuration:cp -p /etc/default/tlp /etc/default/tlp.default
Optionally edit /etc/default/tlp and alter the battery charge thresholds:START_CHARGE_THRESH_BAT0=40
STOP_CHARGE_THRESH_BAT0=45
The above is a good option if the ThinkPad is mainly used at a desk with a plugged in power supply. This should extend the life of the battery. The drawback is that if you need to charge the battery to 100% so you can work without the power supply, you’ll have to stop the TLP service or alter the settings.
Install the ThinkPad specific kernel modules for TLP:dnf install http://repo.linrunner.de/fedora/tlp/repos/releases/tlp-release.fc$(rpm -E %fedora).noarch.rpm
dnf install akmod-acpi_call kernel-devel
For further information about these modules, see Which kernel module do i need for my hardware, tp-smapi or acpi-call? I noted that the ‘akmod-tp_smapi’ module didn’t seem to be required on the ThinkPad P1 – but as per the previous link “remove the unnecessary module package…. However, it doesn’t hurt to keep both.”
Enable the service and start it at boot time:
systemctl enable --now tlp.service
To monitor the TLP service:tlp-stat
Summary
With a few tweaks, Fedora 30 is running on the ThinkPad P1 using the NVIDIA Graphics driver and with ‘hybrid’ options selected in the BIOS. TLP settings are working fine.
Useful resources
- Hardware Issues with Fedora 28 on Lenovo P52
- Arch Wiki Lenovo ThinkPad P1
- Reddit thread: ThinkPad P1 running Arch Linux incl link to fingerprint reader solution
- RPM Fusion NVIDIA drivers documentation
- Reddit thread: Beware BIOS 1.15 for P1!!! Thermal cap now at 80c : thinkpad
- Fedora 28 on a ThinkPad P1
- Fedora on a ThinkPad P1
5 thoughts on “Fedora 30 on a ThinkPad P1”
Great article!
One question:
When configuring tlp charging settings like so …
START_CHARGE_THRESH_BAT0=40

STOP_CHARGE_THRESH_BAT0=45
… does that mean that the laptop will remain charging practically forever at 44%? I was under the impression that charging would stop at 45% until it hits 40% again and then charging would kick in. However, this is not so and I do not know if this will have a negative effect on my battery.
From a starting state of 0% charge, the battery will charge up to 45% and then stop charging. At that point you are running on mains power. This is the same behaviour as seen running under Windows 10 with the Lenovo Vantage tools (see some screenshots at Battery charge stops at 60% (plugged in, not charging) – idea/Lenovo laptops). The battery will have some natural discharge, and gradually reduce from 45% over time. This link suggests 40% is a good storage value Battery – conservation mode. Like you, I initially thought it might cycle – charge up to 45%, drop to 40% and then go back to 45% and repeat but that’s not the case.
Right on. I appreciate the reply.
Any thoughts on buying a P1 (or X1 extreme) without the nvidia? Seems it’s possible to buy without discrete graphics (at least in the outlet); thought maybe it will save me some headache 🙂
Mentions